Anvil App for Sentiment Detection using GPT-4


In this article, we will use Anvil, Python and OpenAI GPT-4 API to create a web app to detect sentiment from text input. This task of finding the sentiment of text data is also known as sentiment analysis.
The backend of this web app will run on an external server, like Google Colab, and it will be connected to the front-end UI through Anvil Uplink.
What is Sentiment Detection?
Sentiment detection, also known as sentiment analysis, is a natural language processing (NLP) technique that involves determining the sentiment or emotional tone expressed in a given text. It aims to understand whether a piece of text, such as a review, tweet, or customer feedback, conveys a positive, negative, or neutral sentiment.
Understanding Backend Code of GPT-4 Sentiment Analysis App
We will first have to install two libraries in Google Colab - openai and anvil-uplink.
! pip install openai
! pip install anvil-uplink
Import Libraries and Specify Secret Keys
Next, we will import the required libraries and specify the secret key of OpenAI API and the plink key of our Anvil App.
import json
import openai
import anvil.server

# enter Anvil app's uplink key
anvil.server.connect("ENTER YOUR ANVIL SERVER UPLINK KEY")

# enter OpenAI API secret key
openai.api_key = "ENTER YOUR OPENAI API SECRET KEY"
Using OpenAI Function Calling for Sentiment Detection
OpenAI has recently come up with a feature called Function calling. It enables the users to get structured output from GPT models. Please refer to this article to learn more about Function calling.
We will use Function calling with the OpenAI API and the GPT-4 model (gpt-4-0613) for this tutorial on sentiment analysis.
Let's first define an object that will be used with OpenAI Function calling.
sentiment_detection_object = [
        {
            "name": "find_sentiment",
            "description": "Finds the sentiment of the input text.",
            "parameters": {
                "type": "object",
                "properties": {
                    "sentiment": {
                        "type": "string",
                        "enum": ["positive", "negative", "neutral"],
                        "description": "Sentiment label for the input text."
                        }
                    }
                },
                "required": ["sentiment"]
            }
        ]
In this object, we have to name and explain an imaginary function that will be used with GPT Function-calling for sentiment extraction from text.
Let's call the function "find_sentiment" and also for the "description" key, describe what this function is supposed to do. This description is highly important as it tells the GPT-4 model what your function is all about and that in turn enables GPT-4 to generate relevant output.
Next, we have to define the parameters that will be used by the function. We need only one parameter and that is 'sentiment'. This parameter can have 'positive', 'neutral', or 'negative' as its value. There is also a description for this parameter that would help the GPT-4 model in extracting the right value for this parameter.
Call GPT-4 using OpenAI API
Now let's use the OpenAI API and Function calling to perform sentiment analysis. The Function calling feature is available with gpt-4-0613 and gpt-3.5-turbo-0613 models as of now.
input_text = "I hate walking in a crowded place."

# Sentiment detection using GPT-3.5-turbo
response = openai.ChatCompletion.create(
    model = "gpt-4-0613",
    messages = [{"role": "user", "content": input_text}],
        functions = sentiment_detection_object,
        function_call = {"name": "find_sentiment"},
)
Generate the sentiment for an input sentence - "I hate walking in a crowded place."
# model's response
print(response['choices'][0]['message']['function_call']['arguments'])

# output: {"sentiment": "negative"}
As you can see the output is a JSON object with "sentiment" as the key and "negative" as its value. This is the benefit of using GPT-4 with Function calling as it enables the users to extract data in a fixed format.
Integrate OpenAI API with Anvil Server Function
Let's define a function that will be connected to the Anvil frontend UI and it will receive the input text from the UI and pass it to the OpenAI API. Then the function will return the sentiment label for the input text.
@anvil.server.callable
def detect_sentiment(text = None):
  # Sentiment detection using GPT-3.5-turbo
  response = openai.ChatCompletion.create(
      model="gpt-4-0613",
      messages=[{"role": "user", "content": text}],
          functions=sentiment_gpt_function,
          function_call={"name": "find_sentiment"},
  )

  return response['choices'][0]['message']['function_call']['arguments']
Finally, run the Anvil server using the code below.
anvil.server.wait_forever()
Frontend of Sentiment Detection App
In this app, the user will enter a sentence or a paragraph and the app will send that text input to Google Colab through Anvil Server Uplink where we have a GPT-4 function running. That function will return a sentiment label for the input text and it will be displayed on the frontend of the app.
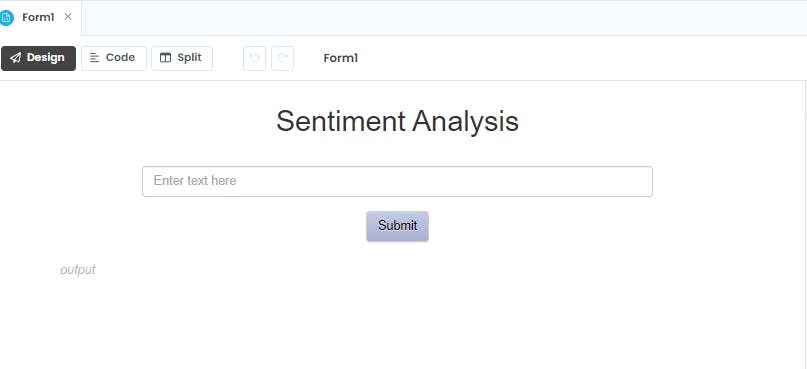
Our Anvil App has 4 components as shown below.
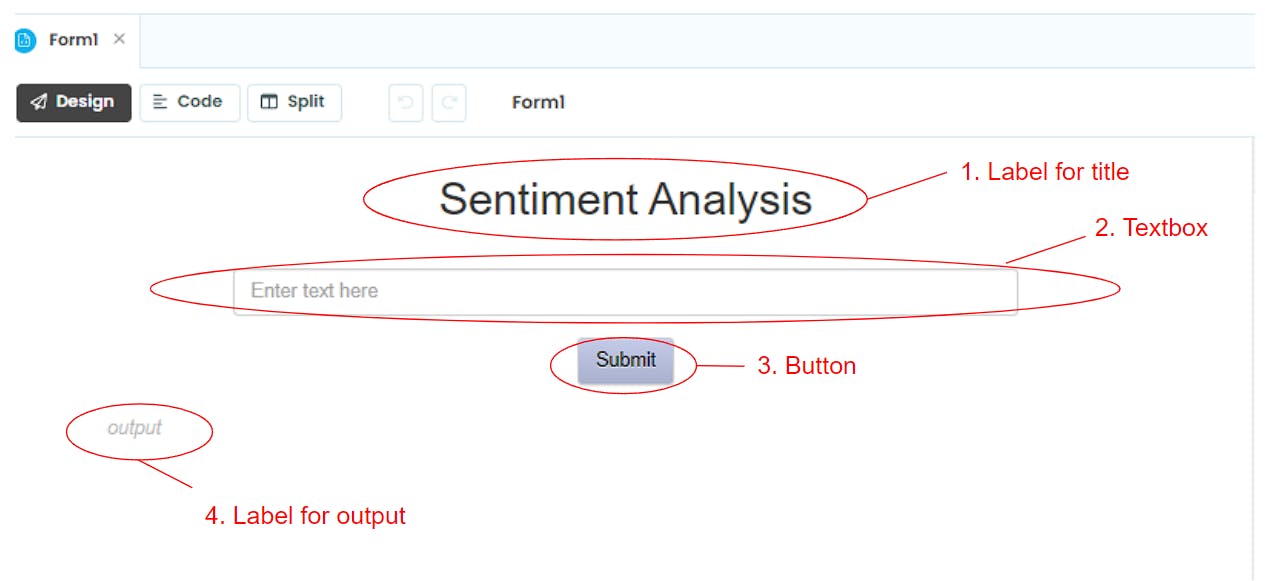
UI Components of Anvil App
1. Label for title
The Label component in Anvil can be used to display static or dynamic text as per the requirement. The title "Sentiment Analysis" is a static text.
2. Textbox
The Textbox component allows the users to enter text or string input that can be used for a variety of use cases.
3. Button
The Button component is used to perform an action when clicked by the user. We will use the Submit button to send the text entered in the Textbox to the OpenAI API through Anvil Uplink.
4. Label for output
This second Label component is used to display dynamic content, i.e., output from the GPT-4 model which is going to be the sentiment label.
Python Code for Frontend Logic
Once the UI of our app is ready, then we can build logic and connect some of the components of the app using Python.
Click on the Code button at the top-left corner of the app to open the Anvil's Python editor. To get back to the drag-and-drop UI of Anvil click on the Design button

Double-click the Submit button, it will create a Python function in the code editor.
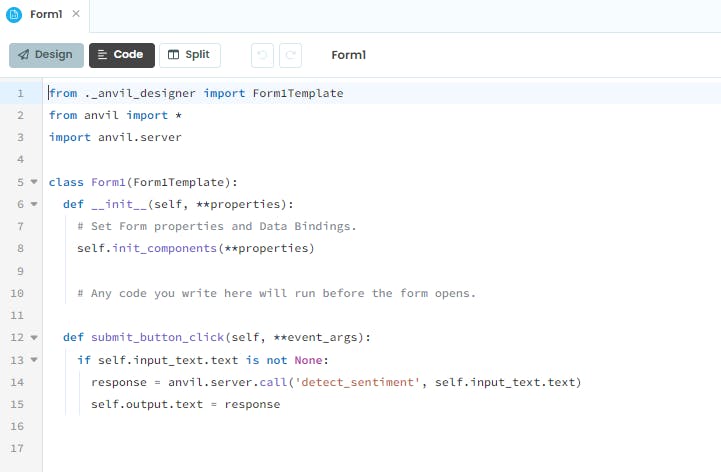
The default name of the function is submit_button_click( ) and it will get executed whenever the user will click the Submit button.
Inside this function, we are calling the detect_sentiment( ) function that is running in Google Colab and also passing the input text (self.input_text.text) entered by the user in the Textbox as an argument.
If the input is a valid string then we will get a response in the form of a sentiment label which can be 'positive', 'neutral', or 'negative'.
Then we are assigning the response to the output label component (self.output.text) which will display the sentiment to the user.
Run GPT-4 Enabled Anvil App
Make sure anvil.server.wait_forever( ) function is running in your Google Colab. Then in Anvil, click on the green-colored Run button in Anvil to run the app.
Type a sentence in the Textbox and click on the Submit button.

You will get a sentiment label as the response by the GPT-4 model. So, we can build different types of user interfaces on the Anvil platform and run the backend code on a separate server (like Google Colab). This is possible even with the free plan of Anvil.